


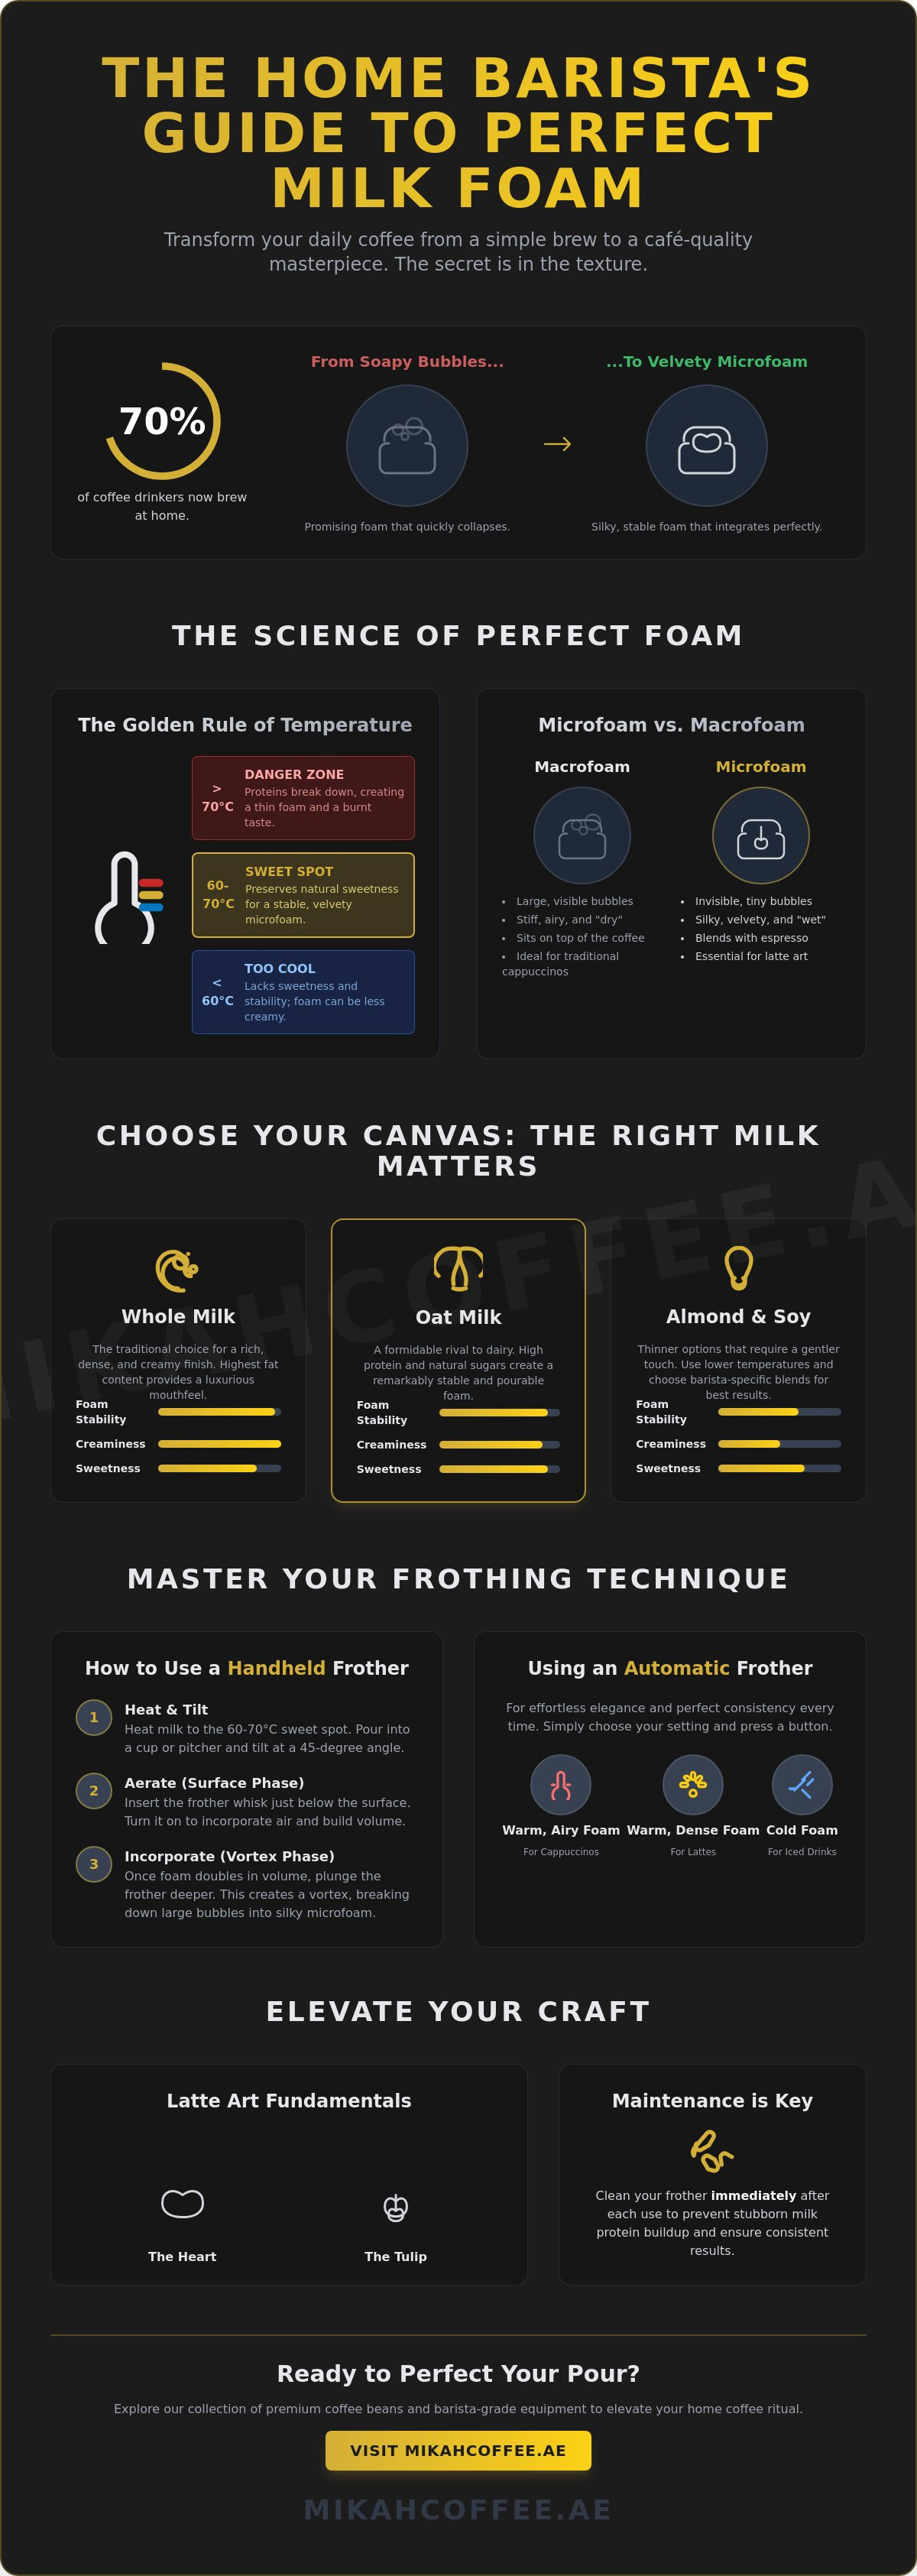
The difference between a standard morning coffee and a true café masterpiece isn't the bean alone; it's the texture of the air you fold into your milk. With 70% of coffee drinkers now preparing their daily cup at home, the quest for the perfect latte has moved from the café counter to the kitchen island. You've likely felt the frustration of watching a promising foam collapse into large, soapy bubbles before you've even taken your first sip. Learning how to use a milk frother with precision is the bridge between a simple caffeine fix and a sophisticated daily ritual.
We understand that achieving that elusive, velvety microfoam can feel like a guarded secret. Whether you're struggling with milk that won't stay hot or finding it difficult to tame the unique proteins in oat and almond milks, the solution lies in technique. This guide provides the expertise you need to master barista-standard textures using your Mikah equipment. We'll walk through the critical distinction between frothing and steaming, provide temperature secrets for lasting stability, and ensure your cleanup is as seamless as your pour.
Key Takeaways
- Discover the "Golden Rule" of milk temperature, keeping your pour between 60°C and 70°C to preserve natural sweetness and prevent protein breakdown.
- Master how to use a milk frother by utilizing a 45-degree tilt and a precise surface phase to incorporate the perfect microfoam.
- Explore the effortless elegance of automatic frothers, leveraging specific settings for warm, airy, or cold froth to suit any beverage.
- Elevate your daily ritual by learning the fundamental movements behind classic latte art patterns like the heart and the tulip.
- Maintain the longevity of your equipment with immediate cleaning techniques that prevent protein buildup and ensure consistent foam quality.
What is a Milk Frother and Why It Elevates Your Coffee Ritual
Coffee is more than a morning necessity; it's a sensory experience that begins with the sound of the grind and concludes with the first sip of velvet. The secret to that luxurious, café-style finish lies in the texture of the milk. For many enthusiasts, learning how to use a milk frother is the definitive turning point in their home brewing journey. It transforms a flat, dark liquid into a multi-layered masterpiece where the natural sweetness of the milk balances the intensity of the espresso. This isn't just about aesthetics. It's about a fundamental shift in how the beverage interacts with your palate.
At its core, a Milk Frother is a specialized instrument designed to aerate milk, creating a rich, bubbly, or velvety foam through the rapid introduction of air. This process fundamentally alters the mouthfeel of the coffee. Microfoam, the gold standard for baristas, consists of bubbles so small they're invisible to the naked eye. This structure creates a creamy, silk-like consistency that carries the coffee's aromatic oils across your tongue more effectively than liquid milk alone. In the modern UAE home, where the specialty coffee movement continues to grow, the frother has become an indispensable part of the connoisseur's toolkit.
Froth vs. Steam: Understanding the Texture
There is a nuanced science to the air you incorporate into your pitcher. Macrofoam features large, visible bubbles that sit stiffly on top of the cup, a texture often associated with traditional "dry" cappuccinos. In contrast, microfoam is "wet" and pourable, blending seamlessly with the espresso for a harmonious latte. While frothing focuses on air incorporation, steaming involves injecting heat and moisture simultaneously. If you want to explore the technical differences between these methods, our detailed guide on Milk Steamer vs Frother: The Connoisseur’s Guide to Perfect Milk Texture offers a deeper look into achieving that professional finish.
The Anatomy of a Premium Frother
Choosing the right instrument depends on your desired level of involvement in the craft. Handheld whisks offer precision control, allowing the hands-on enthusiast to manually manipulate the depth and angle of aeration for a bespoke texture. Automatic jugs, such as the Mikah Milk Frother, provide effortless consistency and elegant design. These devices handle both heating and frothing at the touch of a button, ensuring the milk reaches the perfect temperature without the risk of scalding. When you master how to use a milk frother of this caliber, you gain the confidence to serve drinks that rival the most sophisticated boutiques in the city.
The Science of the Perfect Foam: Temperature and Milk Choice
Creating the perfect microfoam is as much a chemistry experiment as it is an art form. While the mechanical aspect of how to use a milk frother is vital, the biological makeup of your milk dictates the final result. The secret lies in the delicate dance between proteins and fats. Proteins act as the structural scaffolding, stretching to trap air bubbles, while fats provide the heavy, luxurious mouthfeel that lingers on the palate. If your milk is too warm or lacks freshness, this structure collapses, leaving you with a watery cup rather than a velvety masterpiece.
Precision is paramount. The "Golden Rule" of milk preparation is to maintain a temperature between 60°C and 70°C (140°F–155°F). Within this window, the milk's sweetness is at its peak. Once you cross the 70°C threshold, the proteins begin to denature and break down. This results in a thin, unstable foam and a distinctive "burnt" aroma that masks the nuanced notes of your Mikah Coffee Beans. Freshness is equally non-negotiable. As milk ages, its chemical composition shifts, making it significantly harder to sustain a stable vortex during the aeration process.
Choosing Your Canvas: Dairy and Plant-Based Options
Your choice of milk serves as the foundation of your drink's texture. Whole milk remains the traditional favorite for connoisseurs, offering the highest fat content for a dense, creamy finish. However, the 2026 specialty coffee landscape has seen oat milk become a formidable rival. Due to its high protein content and natural sugars, oat milk produces a stable, pourable foam that mimics dairy more closely than any other alternative. For those experimenting with thinner options like almond or soy, success requires a gentler touch and lower temperatures. To master these nuances, explore our guide on the Best Milk for Frothing Latte: The Connoisseur’s Guide to Silky Microfoam (2026).
Temperature Control in the UAE Climate
In the warmth of the UAE, maintaining a cold starting point is critical. Milk should come directly from the refrigerator at approximately 4°C to give you the longest possible window for aeration before reaching the target temperature. If you don't have a thermometer, use the "Hand Test" by resting your palm against the side of the pitcher; when the metal becomes uncomfortably hot to the touch, you've reached the ideal range. Beyond the golden range lies the scald point, where the milk's delicate lactose sugars begin to caramelize and eventually burn, destroying the natural sweetness of your latte. Mastering how to use a milk frother effectively means respecting these thermal boundaries to ensure every sip is harmonious.
How to Use a Handheld Milk Frother: A Step-by-Step Guide
While the science of proteins and fats provides the foundation, the actual execution requires a steady hand and a keen eye. Mastering how to use a milk frother in its handheld form is about understanding the physics of the liquid. It isn't a matter of simply turning the device on; it's a choreographed movement designed to integrate air and then refine it into silk. This manual control is exactly what many enthusiasts prefer, as it allows for a bespoke texture tailored to the specific coffee blend of the day.
Positioning is everything. By tilting your cup or pitcher at a 45-degree angle, you create the necessary path for the milk to circulate efficiently. This specific angle allows the whisk to catch the surface without splashing, initiating what connoisseurs call the "Surface Phase." During these first 5 to 10 seconds, you're intentionally incorporating air. You'll hear a distinct, sharp hissing sound, much like the sound of a professional steam wand in a high-end boutique. This is the sound of your microfoam being born.
Once you've introduced enough air, you must transition immediately to the "Submerged Phase." Lower the whisk head deeper into the liquid, moving it away from the surface. Here, the goal is to create a powerful, consistent vortex. This whirlpool effect is the critical step that breaks down those larger, "soapy" bubbles into the microscopic structure that defines a true latte. Without this stage, the foam remains separated and lacks the glossy finish required for elegant presentation.
Step-by-Step Handheld Mastery
- Step 1: Heat your milk to the target temperature (60°C–70°C) in a tall, narrow pitcher to allow for maximum expansion.
- Step 2: Submerge the whisk head just below the surface before activating the power to avoid unnecessary mess.
- Step 3: Maintain the 45-degree tilt and move the whisk up and down slightly to pull in air, listening for that characteristic hiss.
- Step 4: Lower the whisk deeper to initiate the whirlpool, holding it steady until the texture is uniform, dense, and glossy.
Common Handheld Mistakes to Avoid
When people first learn how to use a milk frother, they often over-aerate. If you spend too much time at the surface, you'll end up with a stiff, dry foam that sits on top of the coffee like a cloud rather than blending with the espresso. Another common pitfall is battery fatigue. A handheld frother requires consistent, high-speed rotation to maintain a vortex; if the motor sounds sluggish, your foam will be thin and unstable. Finally, consider your vessel. Using a cup that is too wide prevents the milk from gathering enough momentum to spin. Finish your process with the "tap and swirl" method: tap the pitcher on the counter to pop any remaining large bubbles and swirl the milk to keep the texture integrated before you pour.
Mastering the Automatic Milk Frother for Effortless Elegance
While the handheld whisk offers a tactile connection to the craft, the automatic frother represents the pinnacle of precision engineering for the modern home. For the busy professional, the morning ritual must be seamless without sacrificing the excellence of a boutique café experience. These devices provide the luxury of one-touch preparation, where the milk is heated and aerated simultaneously. Understanding how to use a milk frother that operates automatically requires a different kind of focus, one centered on preparation and the selection of the correct settings rather than manual manipulation.
The true advantage of a premium automatic system lies in its magnetic whisk. Unlike handheld motors that can fluctuate in speed, a magnetic induction whisk maintains a consistent RPM throughout the entire cycle. This stability is what creates that uniform, tiny bubble structure essential for high-quality microfoam. It's a methodical process that ensures your first cup of the day is as perfect as your last. Whether you're preparing a dense cappuccino foam or a light, pourable latte texture, the machine handles the complexity of temperature and vortex control with quiet, reliable elegance.
How to Operate an Automatic Frother
Precision begins with the fill line. Filling the jug past the indicated "Max" line is the most frequent cause of poor aeration, as the milk needs sufficient headspace to expand as it incorporates air. You must also select the appropriate whisk attachment; a coiled whisk is designed for thick, airy foam, while a smooth whisk is intended for simple warming. Don't overlook the "Cold Froth" setting. This is a secret weapon for the UAE climate, allowing you to create a thick, chilled foam that transforms a standard iced coffee into a refreshing summer masterpiece without diluting the flavor with excess ice.
The Mikah Automatic Experience
The Mikah Milk Frother is designed to be the perfect companion for our most refined offerings. For an authentic Italian experience, we recommend pairing your freshly frothed milk with our Milano blend coffee beans, where the creamy texture of the foam elevates the blend's cocoa and toasted nut notes. This versatility extends beyond coffee. By using the warm froth setting, you can achieve a perfectly emulsified Ceremonial Grade Matcha latte, ensuring the delicate powder is fully integrated into a cloud-like texture. It's a sophisticated way to elevate every daily ritual.
Ready to transform your kitchen into a high-end coffee boutique? Discover the precision and style of the Mikah Milk Frother and master the art of the perfect pour today.
Advanced Techniques and Maintenance for the Home Connoisseur
Once you've mastered the mechanical aspects of how to use a milk frother, the focus shifts toward the artistic and the enduring. A true connoisseur knows that the ritual doesn't end when the foam hits the coffee. It continues through the delicate movements of latte art and the disciplined maintenance of the equipment. Creating a classic heart or a tiered tulip requires a pitcher of perfectly textured microfoam and a steady, rhythmic pour. These designs aren't just for show; they indicate a perfect marriage between the milk's density and the espresso's crema, ensuring the mouthfeel is consistent from the first sip to the last.
Maintenance is the silent partner of excellence. Milk is a delicate substance, and its proteins can quickly transform into a stubborn residue known as milk stone if left to dry on your equipment. This buildup doesn't just compromise the flavor of your next cup; it can physically impede the whisk's ability to create a stable vortex. If you've ever wondered why your milk suddenly won't froth despite following every step, a microscopic layer of protein on the sensor or whisk is often the culprit. Consistency in cleaning is what separates a casual user from a dedicated home barista.
Hygiene and Longevity
For handheld models, the "Rinse and Spin" method is the most efficient way to maintain a pristine whisk. Immediately after use, submerge the whisk in a glass of clean, warm water and activate it for several seconds. This centrifugal force sheds any clinging milk particles before they can harden. For automatic jugs, pay close attention to the internal sensor at the base. A gentle wipe with a soft, damp cloth after every cycle prevents scorching and ensures the thermostat remains accurate. For a more thorough routine, our How to Clean a Milk Frother: The Connoisseur’s Hygiene Checklist (2026) provides a definitive guide to boutique-level care.
Elevating the Ritual: Beyond the Basics
The versatility of the Mikah Milk Frother allows you to experiment with sensory infusions that go beyond the traditional. Try adding a pinch of ground cinnamon or a drop of pure vanilla bean extract directly to the milk before you begin the frothing cycle. This integrates the flavor into the very structure of the foam, creating a more cohesive aromatic profile than a simple garnish. You can even use this precision to craft a "Golden Matcha Latte" by frothing our Ceremonial Grade Matcha with a hint of turmeric and honey. Ultimately, a layer of well-frothed milk acts as a thermal blanket that preserves the delicate aromatics of an Italian roast by preventing the rapid escape of volatile oils.
Crafting Your Daily Masterpiece
The journey from a simple caffeine fix to a true connoisseur's cup is defined by the quality of your texture. By mastering the science of milk temperature and the specific physics of the vortex, you've unlocked the secret to a professional-grade finish. Whether you prefer the tactile control of a handheld whisk or the effortless precision of an automatic jug, the result should always be a glossy, persistent microfoam that elevates every sip. Learning how to use a milk frother with expert precision is the foundation of this daily ritual, allowing you to bridge the gap between home brewing and the finest boutique cafés.
To truly mirror the excellence of an Italian espresso bar, your equipment must be as refined as your technique. Our tools feature authentic Italian design and are trusted by UAE coffee connoisseurs who refuse to compromise on quality. When perfectly paired with our Milano Blend, these instruments ensure a symphony of flavor and texture in every cup. Elevate your morning ritual with the Mikah Milk Frother and begin your pursuit of the perfect pour today. The art of the craft is now in your hands, and we're honored to be part of your coffee legacy.
Frequently Asked Questions
Can I froth cold milk with a handheld frother?
Yes, you can certainly froth cold milk with a handheld device. In fact, cold milk often produces a more stable foam because the proteins haven't been weakened by heat yet. This is a perfect technique for creating chilled toppings for iced lattes or cold brews, especially during the warmer months in the UAE when a refreshing, aerated texture is desired.
What is the best milk for frothing a latte at home?
Whole dairy milk remains the gold standard for its rich fat content and structural proteins, which create a dense, creamy microfoam. If you prefer a plant-based alternative, barista-edition oat milk is the superior choice due to its ability to hold a stable vortex. Both options provide the luxurious mouthfeel required for a truly sophisticated home brewing experience.
Why is my milk frother not making enough foam?
Insufficient foam usually stems from using milk that isn't cold enough or equipment that has lingering protein residue. If your milk has been sitting at room temperature, its chemical structure changes, making it difficult to trap air effectively. Additionally, ensuring you know how to use a milk frother at the correct 45-degree angle is essential for creating the necessary aeration.
How long should I froth milk with a handheld device?
You should typically froth for 15 to 30 seconds in total to achieve the best results. The first 5 to 10 seconds should be spent at the surface to incorporate air, followed by another 15 seconds submerged to refine the bubbles into a silky microfoam. Over-frothing beyond this point can lead to a stiff, dry texture that doesn't pour smoothly into your espresso.
Can I use a milk frother for matcha or hot chocolate?
Absolutely, a frother is an excellent tool for emulsifying specialty powders like Ceremonial Grade Matcha or premium cocoa. The rapid whisking action ensures that the fine particles are fully integrated into the liquid, preventing clumps and creating a uniform, aerated texture. It's a simple yet effective way to elevate these traditional beverages into a café-quality ritual.
What temperature should milk be for the best froth?
The ideal temperature range for milk foam is between 60°C and 70°C (140°F to 155°F). This specific window maximizes the natural sweetness of the lactose while maintaining the structural integrity of the proteins. Heating milk beyond 70°C will result in a scorched flavor and a thin, unstable texture that dissipates quickly in the cup.
Is a handheld frother better than an automatic one?
Neither is objectively better; the choice depends on your lifestyle and desired level of involvement. A handheld frother offers a tactile, manual experience for those who enjoy the "art" of the craft and want bespoke control. Conversely, an automatic frother provides unmatched consistency and integrated heating, making it the preferred choice for busy professionals who value efficiency.
How do I clean my frother to prevent milk buildup?
The most effective method is to rinse the whisk head immediately after every use under warm, running water. For handheld devices, a quick "spin" in a glass of warm, soapy water will dislodge any hidden proteins before they can harden. This prevents the formation of milk stone, ensuring your equipment remains in boutique condition for years of reliable service and perfect how to use a milk frother sessions.